Skip to content
Accounting

Chart of Accounts Setup

Accounting

Chart of Accounts Setup

Configure your chart of accounts, account types, fiscal positions, and tax mappings for accurate financial reporting.

6 steps Updated Mar 7, 2026 SOP · Standard

The chart of accounts (CoA) is the foundation of your financial data — every transaction in Odoo posts to accounts in the CoA. Getting it right before going live avoids expensive reclassification later. This guide covers initial setup, account types, and the tax/fiscal position system.

1

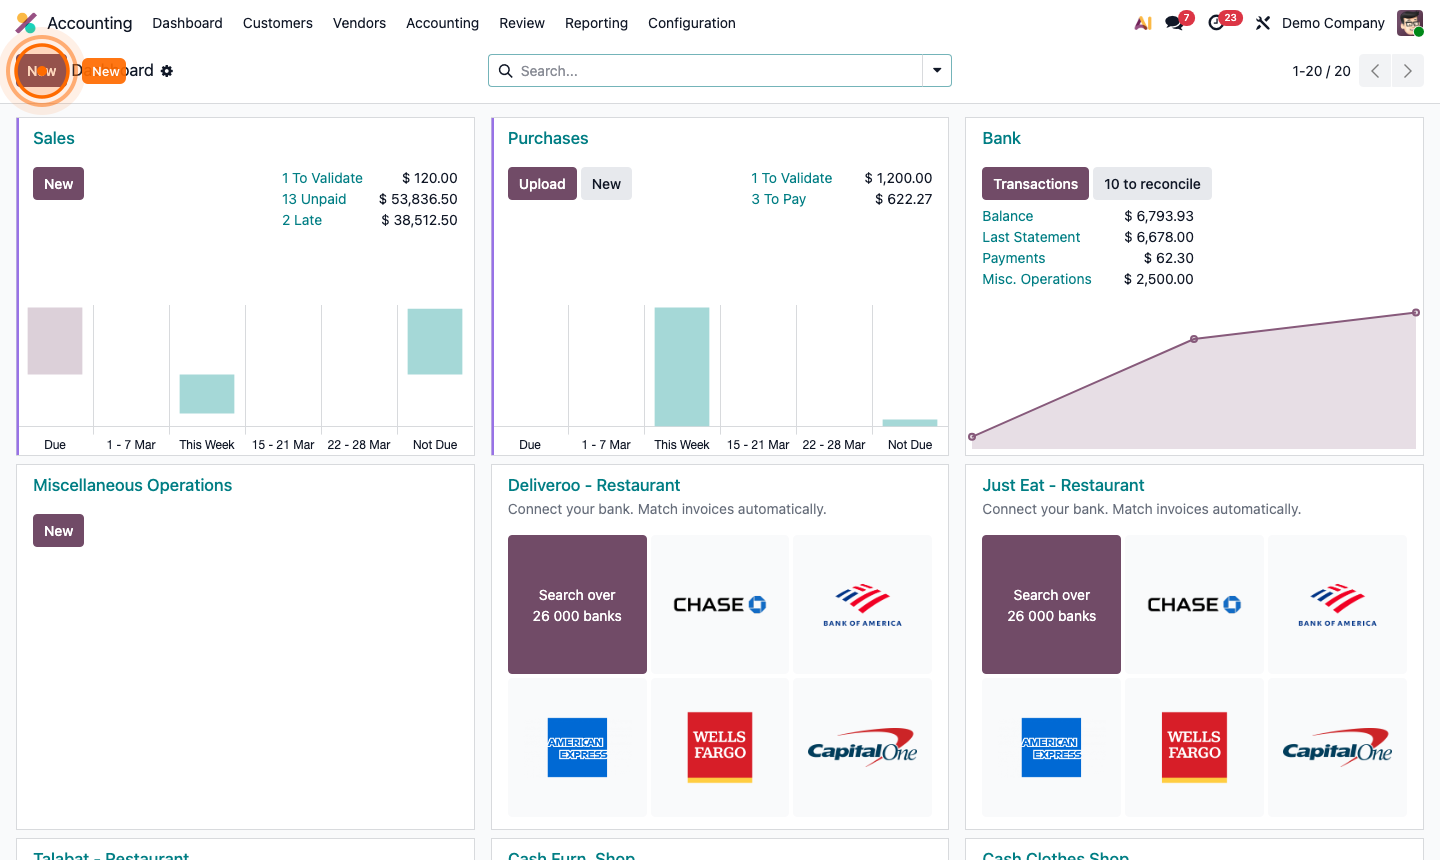
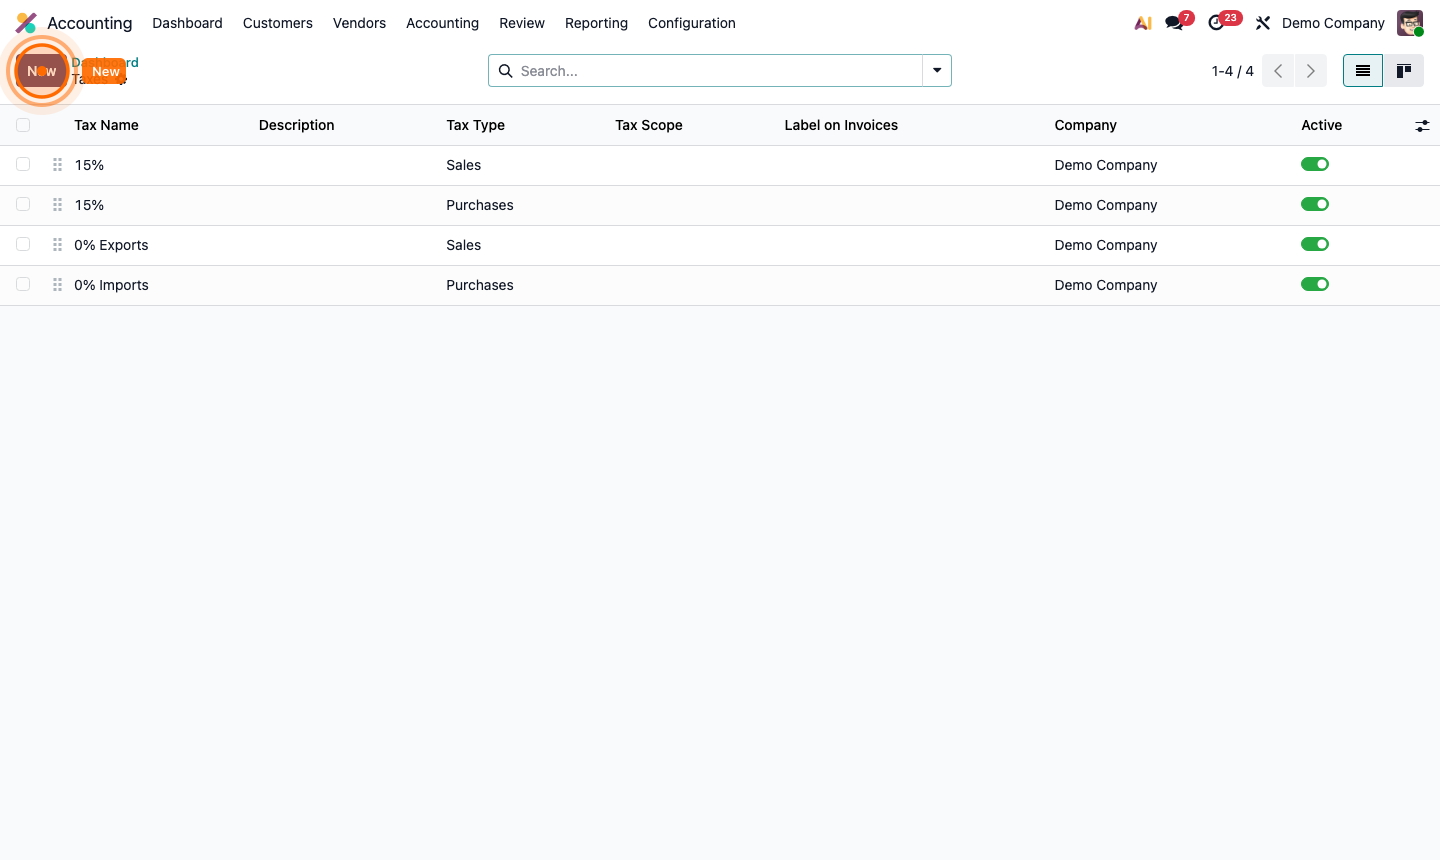
View the Chart of Accounts

Go to Accounting → Configuration → Chart of Accounts.

The list shows every account with:

  • Code — the account number (e.g., 1000 for cash, 4000 for revenue)
  • Account Name — descriptive label
  • Type — the account type (Asset, Liability, Equity, Income, Expense)
  • Internal Type — sub-type (Receivable, Payable, Bank, etc.)
  • Deprecated — archived accounts no longer used

The structure typically follows:

  • 1xxx — Assets (cash, receivables, inventory)
  • 2xxx — Liabilities (payables, loans)
  • 3xxx — Equity
  • 4xxx — Revenue
  • 5xxx-6xxx — Expenses

Step 1: Chart of accounts list showing account codes, names, types, and balance columns

2

Create or Edit an Account

Click New (or open an existing account to edit).

Key fields:

  • Account Code — unique number following your numbering scheme
  • Account Name — clear, descriptive label
  • Type — critical: drives P&L vs balance sheet placement
    • Income Accounts → appear on Profit & Loss
    • Expense Accounts → appear on Profit & Loss
    • Receivable / Payable → appear on Balance Sheet, enable partner tracking
    • Bank → linked to a bank journal
  • Default Taxes — taxes that auto-apply when this account is selected on a bill or invoice
  • Currency — leave blank for company currency, or set for foreign currency accounts
  • Deprecated — check to hide the account from new entries (use instead of deleting)

Step 2: Account form showing code, name, type, default taxes, and currency fields

3

Set Default Accounts on Products

Rather than manually selecting accounts on every invoice line, set defaults on products.

Open a product. Click the Accounting tab:

  • Income Account — the revenue account for customer invoices
  • Expense Account — the cost account for vendor bills
  • COGS Account — cost of goods sold for storable products

When the product is added to an invoice or bill, the correct account is selected automatically.

For categories: Go to Inventory → Configuration → Product Categories and set income/expense/COGS accounts at the category level — all products in that category inherit the setting unless overridden on the product itself.

Step 3: Product accounting tab showing income account, expense account, and COGS account fields

4

Configure Tax Rates

Go to Accounting → Configuration → Taxes.

Odoo installs default taxes for your country (e.g., 20% VAT, 10% GST). Review and adjust:

  • Tax Name — e.g., “Tax 20%”, “EU VAT 21%”
  • Tax Type — Sales (on invoices) or Purchase (on vendor bills)
  • Computation — Percentage of price, Fixed amount, or Group of taxes
  • Tax Accounts — which GL accounts the tax amount posts to

For complex scenarios (multiple tax rates, compound taxes), use Tax Groups to combine taxes. For example, a 5% federal tax + 8% state tax can be combined into a single “13% Sales Tax” group.

Step 4: Tax configuration showing tax rate, type, accounts, and repartition lines

5

Set Up Fiscal Positions

Fiscal positions automatically remap taxes and accounts based on the customer’s location or tax status.

Go to Accounting → Configuration → Fiscal Positions. Click New:

  • Name — e.g., “EU B2B (Intra-Community)”, “US Customer”, “Tax Exempt”
  • Auto-detect — automatically applies when creating invoices for matching customers
    • By country, country group, or VAT number
  • Tax Mapping — “When tax X is used, replace it with tax Y”
  • Account Mapping — “When account A is used, replace it with account B”

Example: For EU business customers with a VAT number (intra-community supply), a fiscal position maps 20% VAT → 0% VAT and posts to the intra-community revenue account.

Step 5: Fiscal position form showing auto-detection rules and tax mapping table

6

Define Your Fiscal Year

Go to Accounting → Configuration → Settings → Fiscal Year.

Set:

  • Start Date — the beginning of your financial year (e.g., January 1 or April 1)
  • Last Day — the last day of your fiscal year

Odoo uses this for:

  • Period locking (closing old periods to prevent edits)
  • Annual financial reports
  • Tax return periods (quarterly/monthly VAT filing)

After your first fiscal year ends, go to Accounting → Configuration → Lock Dates to lock the closed period, preventing accidental edits to historical data.

Step 6: Accounting settings showing fiscal year dates and lock dates configuration