Skip to content
Purchase

Purchase Orders

Purchase

Purchase Orders

Raise requests for quotation, confirm purchase orders with vendors, receive goods, and process vendor bills.

6 steps Updated Mar 7, 2026 SOP · Standard

The Purchase module manages the procurement of goods and services. A Request for Quotation (RFQ) is sent to a vendor to agree on terms; once confirmed it becomes a Purchase Order (PO), which automatically creates a receipt in Inventory and a bill in Accounting.

1

Understand the Purchase Dashboard

The Requests for Quotation list opens by default. The summary bar at the top provides a live snapshot:

  • New — RFQs not yet sent to the vendor
  • RFQ Sent — sent and awaiting vendor response
  • Late RFQ — overdue (deadline has passed)
  • Not Acknowledged — vendor has not confirmed receipt
  • Late Receipt — goods not yet received past expected date

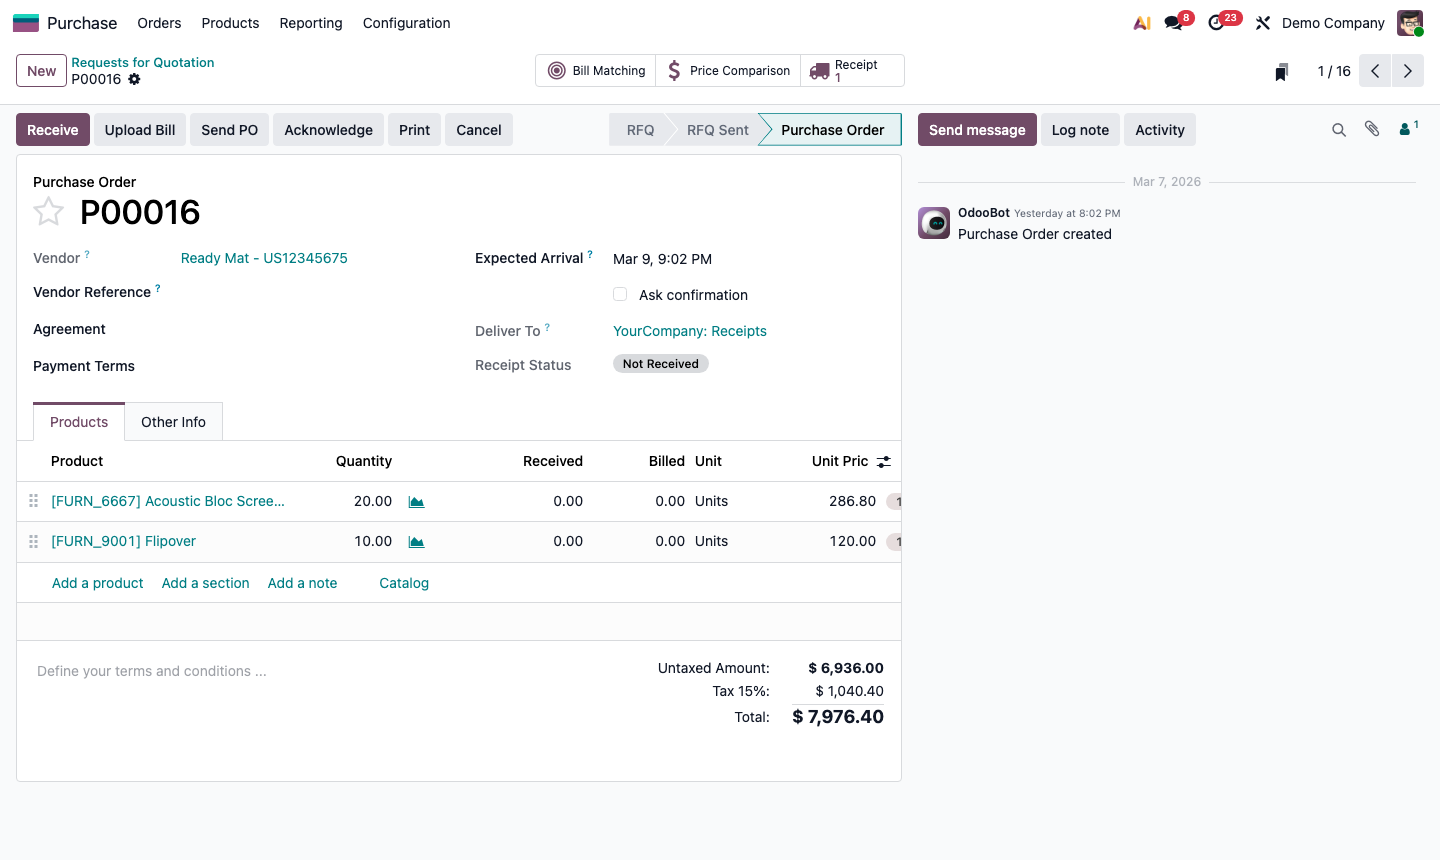
Use Orders → Purchase Orders in the top menu to view confirmed POs only.

Step 1: Purchase RFQ list with status summary bar and order overview

2

Create a Request for Quotation

Click New.

Fill in the header:

  • Vendor — select from Contacts
  • Vendor Reference — the vendor’s quote number (optional, for matching)
  • Order Deadline — when you need the vendor to confirm
  • Expected Arrival — when you need delivery at your warehouse
  • Deliver To — select your receiving warehouse location

In the Products tab, click Add a product:

  • Select the product from the catalog
  • Set Quantity and Unit Price (auto-filled if a vendor pricelist exists)
  • Confirm taxes are correct

Step 2: New RFQ form with vendor, deadline, expected arrival, and product lines

3

Send the RFQ to the Vendor

Once the RFQ is complete:

  1. Click Send PO (or Send by Email).
  2. An email compose window opens with the RFQ PDF attached.
  3. Review the email and click Send.

The RFQ status updates to RFQ Sent. The vendor receives the email with the purchase quote and can reply to negotiate.

Step 3: Send RFQ email dialog with vendor address and PDF attachment

4

Confirm the Purchase Order

When the vendor confirms their price and availability:

  1. Open the RFQ.
  2. Click Confirm Order.
  3. Status changes to Purchase Order and a PO number is assigned (e.g., P00016).

This automatically:

  • Creates a Receipt in Inventory (ready to process when goods arrive)
  • Makes the PO available for vendor bill creation in Accounting

Step 4: Confirmed purchase order with PO number and Receipt smart button

5

Receive the Goods

When the delivery arrives at your warehouse:

  1. Click the Receipt smart button at the top of the Purchase Order.
  2. Compare the Demand (ordered quantity) against what physically arrived.
  3. Enter actual received quantities in the Done column.
  4. Click Validate to confirm receipt.

Stock levels in Inventory are updated immediately. If quantities are short, Odoo will offer to create a backorder for the remainder.

Step 5: Receipt form linked to PO with Demand and Done columns ready to validate

6

Process the Vendor Bill

Once goods are received, process the vendor’s invoice:

  1. From the Purchase Order, click Create Bill (or Upload Bill to use AI scanning).
  2. Review the pre-filled bill details: vendor, bill date, due date, and line items.
  3. Enter the Vendor Bill Reference (the vendor’s invoice number) for easy matching.
  4. Click Confirm to post the bill.
  5. Go to Accounting → Vendors → Bills and click Pay when the payment is due.

Step 6: Vendor bill created from PO with pre-filled details and Confirm button